
My bathroom is full
of ladybirds.
They’re coming in
through the window frame. Which probably means that it needs filling
somewhere or worse, replacing.
It’s not
necessarily a bad thing. The ladybirds being in the bathroom that is,
not the window frame. The whole bathroom needs some serious TLC to be
honest.
I quite like
Ladybirds. They’re probably the only insects that don’t make me
drop everything and run the other way. Known as the gardener’s
friend, these unassuming little bugs eat the nasty creepy crawlies
that eat your best plants.
So as a nod to the
Ladybirds, and a quick-fix to brighten up a room in need of some
makeover inspiration, I decided to make some curtain tie-backs. Using
some Ladybird buttons that I’ve had in my stash forever, and upcycling legs from some old jeans.
(1) First step, chop
up the jeans.

Well, actually, the
first step is to decide how long you want the tie-backs. I wanted
mine to be around 7 inches (17cm) from hook on the wall to the front edge of
the curtain. Just don’t forget that the tie-back goes around the
back to! So when you cut the leg, make sure that you double the
length. I cut a length of 16 inches (40cm) that also allowed for a seam
allowance.

Next I chopped away
the seams.

So I was left with two pieces of denim.

The width of the
tie-backs is down to personal preference. Having folded my leg
pieces in half, They were around 3 inches (7cm) which was OK for me. You
might decide to go a bit thinner.
When you have your
folded over denim – square it up and make sure both are the same
size.

(2) Interfacing
You going to want
the tie-backs to have a bit of body. For that, you will need some
interfacing. The Iron-on fusible type is best. It’s available
wherever they sell fabric. Ask the shop assistant to help you find
it. Medium weight is good enough.
Iron it on to ONE
side of each folded over leg. We want body. We don’t want rigid!
When you iron, make sure the bobbly side of the interfacing is facing
down towards the fabric. If the bobbly side is up, you’ll stick it
to your iron.

(3) Stitching it
OK, this is where
folding the leg parts over starts to make sense. It reduces the
amount of sewing. With one side, already done, you only have to sew
two seams. With right sides together, stitch one end seam and the
base. Leave the other end open.

You’ve made a
long, thin bag. Turn it the fight side out. Now you can stitch the
other end closed using a top stitch close to the edge. Don’t worry
about how it looks, we’re going to be covering it up. Or you could
top stitch all the way around and make a feature of it.
(4) Trim
Find a trim you
like. Ribbon, Ric-rak, beading. Whatever. Head down to the fabric or
craft shop and see the choices on offer. I had some edging already.
It’s been in my stash for years. That’s the thing when you start
sewing. Over time, you accumulate all sorts of bits and bobs. Most of
it will stay unused for ages until the right project pops into mind.

Anyway, using your
trim, decorate your tie-backs, making sure both are identical. I used
glue to attach mine. Make sure that you make a loop with the trim at
each end.

(5) Flowers
To make flowers, you
will need a length of fabric about 1.5 inches wide by 10 inches long,
depending on how big you want your flower. Smaller lengths will give
smaller flowers. Grab a needle and some thread and stitch a running
stitch along one of the longer edges.
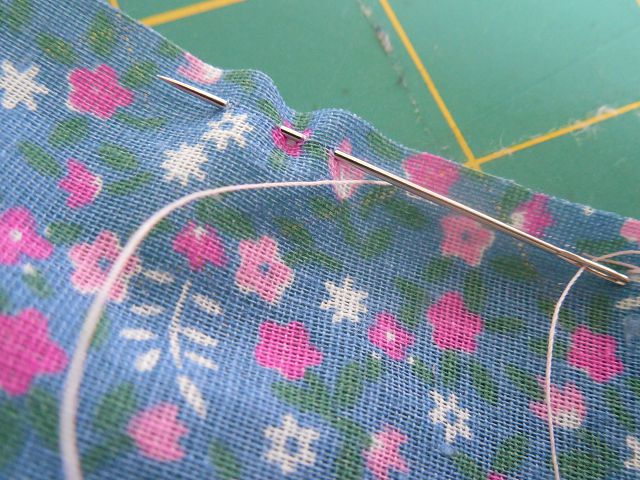
Make sure you secure
the start of the running stitch. Then just push the needle in and out
of the fabric all the way along. Make sure your stitches are even in
size and spacing. Then when you get to the other end, pull on the
thread.
It will gather up
the fabric into a flower shape. Secure the flower. Then, if you want
to, find a novelty button to stitch in the middle. You could even
cover some buttons with fabric. Make as many as you want.
Glue or stitch your
flower to the tie-back and your done.

Enjoy!
Bye for now
Olly
Facebook.com/olwenwhite/
instagram.com/olwenwhitewrites/
Twitter @OlwenWhite
Comments
Post a Comment